Note
Access to this page requires authorization. You can try signing in or changing directories.
Access to this page requires authorization. You can try changing directories.
This article describes how to configure Active Directory Certificate Services (AD CS) certification authorities (CAs) to use Module-Lattice-Based Digital Signature Algorithm (ML-DSA) for Post-Quantum Cryptography (PQC). ML-DSA is a digital signature algorithm standardized by the National Institute of Standards and Technology (NIST), designed to resist quantum computing attacks.
By completing the steps in this article, you set up a two-tier public key infrastructure (PKI) hierarchy with a Root CA and Subordinate CA, both using ML-DSA as the signature algorithm.
Prerequisites
Before you begin, make sure you meet the following requirements:
A domain controller running the latest Windows Server release. Windows Server 2025 or later is recommended.
Two servers running Windows Server 2025 with the 2026-05 Security update (KB5087539) or later installed for the Root CA and Subordinate CA.
The Subordinate CA server must be domain-joined.
The Root CA server can be either domain-joined (Enterprise Root CA) or non-domain joined (Standalone Root CA). See the following note.
Note
This article shows both Enterprise and Standalone Root CA configurations. For production environments, a Standalone Root CA that is taken offline after issuing the Subordinate CA certificate is the recommended best practice. For general two-tier PKI architecture guidance, see AD CS Two Tier PKI Hierarchy Deployment and AD CS design guide.
An account with permissions to install and configure the Certificate Services role on each CA server.
AD CS role and Certification Authority role service installed on the Root CA server. For detailed steps, see Install Active Directory Certificate Services using Server Manager.
Choose an ML-DSA parameter set
Before you configure your CAs, choose an ML-DSA parameter set. ML-DSA provides three parameter sets, each offering a different NIST security level. Each parameter set has fixed public and private key sizes that you can't change. You can use any parameter set for Root CAs, Subordinate CAs, or end-entity certificates.
| Parameter set | Public key size | Private key size | Signature size | NIST security level |
|---|---|---|---|---|
| ML-DSA-44 | 1,312 bytes | 2,560 bytes | 2,420 bytes | Level 2 |
| ML-DSA-65 | 1,952 bytes | 4,032 bytes | 3,309 bytes | Level 3 |
| ML-DSA-87 | 2,592 bytes | 4,896 bytes | 4,627 bytes | Level 5 |
When you select an ML-DSA provider during CA configuration, the hash algorithm defaults to NoHash. Unlike traditional algorithms such as RSA where signing involves a pre-hash step like SHA-256, ML-DSA handles message hashing internally as part of the signature operation. ML-DSA doesn't require an external hash algorithm.
Set up the Root CA
After you install the AD CS role and Certification Authority role service, the next step is to configure the CA with an ML-DSA cryptographic provider. The configuration process involves selecting the CA type (Root CA), choosing to create a new private key, and then selecting the desired ML-DSA provider that corresponds to the parameter set you chose.
Configure the root CA with ML-DSA
After the role installs, configure the root CA with an ML-DSA cryptographic provider.
After installation, select the Configure Active Directory Certificate Services link in Server Manager.
On the Setup Type page, select one of the following:
Enterprise: if the server is domain-joined. Suitable for lab and test environments.
Standalone: if the server isn't domain-joined. Recommended for production.
On the CA Type page, select Root CA.
On the Private Key page, select Create a new private key.
On the Cryptography for CA page, select one of the following ML-DSA cryptographic providers:
ML-DSA:44#Microsoft Software Key Storage ProviderML-DSA:65#Microsoft Software Key Storage ProviderML-DSA:87#Microsoft Software Key Storage Provider
The Key Length field displays the public key size in bits for the selected parameter set. The Hash algorithm defaults to NoHash.

Complete the remaining pages by using the default settings, and then select Configure to finish setup.
Alternatively, configure the root CA by using PowerShell. The following example uses ML-DSA-87:
# KeyLength is specified in bits. For ML-DSA-87: 2592 bytes x 8 = 20736 bits

# For Standalone Root CA (recommended for production)
Install-AdcsCertificationAuthority `
    -CAType StandaloneRootCA `
    -CACommonName "<your-root-ca-name>" `
    -KeyLength 20736 `
    -HashAlgorithm NoHash `
    -CryptoProviderName "ML-DSA:87#Microsoft Software Key Storage Provider"

# For Enterprise Root CA (lab and test environments)
Install-AdcsCertificationAuthority `
    -CAType EnterpriseRootCA `
    -CACommonName "<your-root-ca-name>" `
    -KeyLength 20736 `
    -HashAlgorithm NoHash `
    -CryptoProviderName "ML-DSA:87#Microsoft Software Key Storage Provider"
Replace <your-root-ca-name> with the common name for your root CA.
Verify the root CA certificate
Confirm the root CA certificate uses the ML-DSA algorithm you selected.
Open the Certification Authority console (
certsrv.msc).Right-click the CA name, select Properties, and then select View Certificate on the General tab.
On the Details tab, confirm the following fields:
- Signature algorithm: Shows the ML-DSA parameter set, such as ML-DSA-87.
- Public key: Shows the ML-DSA parameter set and key size in bits.
Because the root CA certificate is self-signed, both the signature algorithm and public key algorithm use the same ML-DSA parameter set.

The CA service automatically publishes certificate revocation lists (CRLs) when it starts and signs them by using the configured ML-DSA algorithm.
Set up the subordinate CA
Configure the subordinate CA as an Enterprise CA (domain-joined) so it can use Active Directory for certificate enrollment and template management. The setup steps for a subordinate CA are similar to the root CA, with two key differences:
- Select Subordinate CA as the CA type.
- You can choose a different ML-DSA parameter set from the root CA. Each CA in the hierarchy can use a distinct ML-DSA configuration.
Configure the subordinate CA
After installing the AD CS role and Certification Authority role service on the subordinate CA server, configure it with an ML-DSA provider and submit a certificate request to the root CA.
After installation, select the Configure Active Directory Certificate Services link in Server Manager.
On the Setup Type page, select Enterprise.
On the CA Type page, select Subordinate CA.
Select Create a new private key.
On the Cryptography for CA page, select an ML-DSA cryptographic provider. For example, ML-DSA:65#Microsoft Software Key Storage Provider.

On the Certificate Request page, select one of the following options:
Send a certificate request to a parent CA, and then choose the previously configured Root CA - if the Root CA is online and reachable.
Save a certificate request to a file on the target machine - if the Root CA is offline (standalone). Submit the request manually to the Root CA, retrieve the issued certificate, and install it.
Complete the remaining pages by using the default settings, and then select Configure.
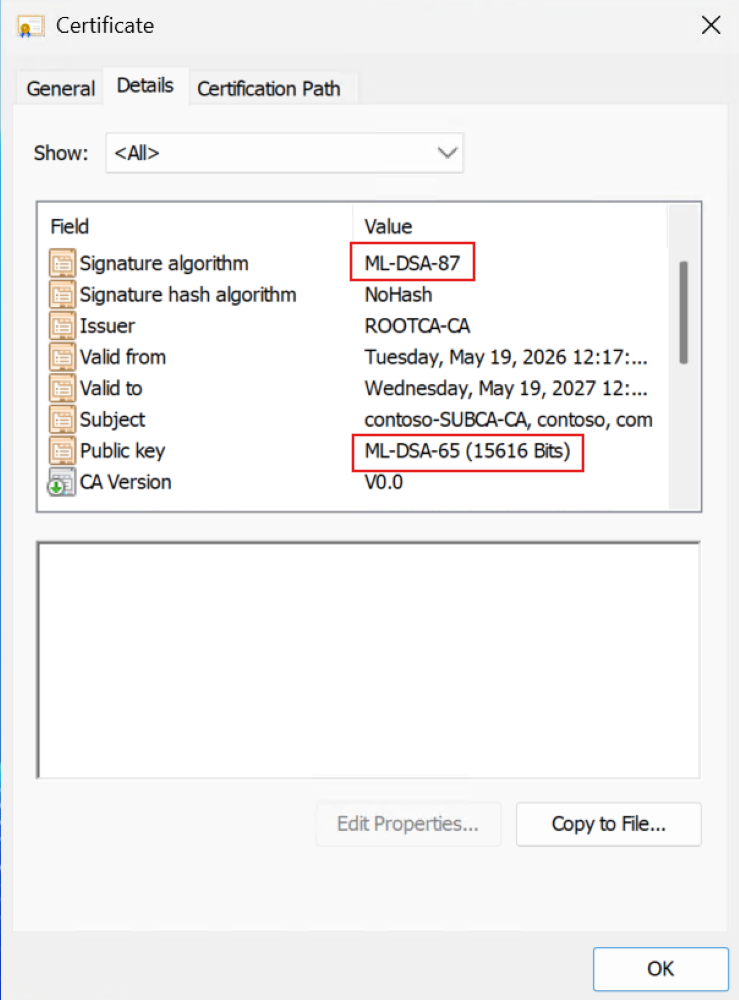
Verify the subordinate CA certificate
Confirm the subordinate CA certificate shows the expected ML-DSA algorithms for both the signature and public key.
Open the Certification Authority console (
certsrv.msc) on the subordinate CA.Right-click the CA name, select Properties, and then select View Certificate.
On the Details tab, confirm:
- Signature algorithm: Shows the Root CA's ML-DSA parameter set (for example, ML-DSA-87), because the Root CA signs the subordinate CA certificate.
- Public key: Shows the subordinate CA's own ML-DSA parameter set (for example, ML-DSA-65).
On the Certification Path tab, verify the chain displays both the Root CA and subordinate CA certificates.
