Note
Access to this page requires authorization. You can try signing in or changing directories.
Access to this page requires authorization. You can try changing directories.
Important
Are you looking to migrate an existing MongoDB application or use MongoDB Query Language (MQL) features? Consider Azure DocumentDB.
Are you looking for a database solution for high-scale scenarios with a 99.999% availability service level agreement (SLA), instant autoscale, and automatic failover across multiple regions? Consider Azure Cosmos DB for NoSQL.
In this guide, you take an existing collection and migrate it from Azure Cosmos DB for MongoDB to Azure DocumentDB using the tooling built-in to the service and Azure portal.
Prerequisites
An Azure subscription
- If you don't have an Azure subscription, create a free account before you begin.
A target Azure DocumentDB cluster
If you don't already have a cluster, create a new Azure DocumentDB cluster.
Ensure that you have the native authentication credentials required to connect to your cluster.
An Azure Key Vault account (not required if your Azure DocumentDB supports Microsoft Entra ID authentication)
- Ensure that the Key Vault account is enabled for role-based access control. For more information, see role-based access control in Azure Key Vault.
Configure managed identity for your source account
Sign in to the Azure portal (https://portal.azure.com).
Navigate to your source Azure Cosmos DB for MongoDB account.
In your source account, navigate to Settings > Identity.
Turn on the system-assigned managed identity for your source account by setting the Status option to On. Note down the value of the Object (principal) ID to use later in this guide.

Tip
If you're using a user-assigned managed identity instead, ensure that at least one user-assigned managed identity is assigned to the source account.
Run the command to update your source account to use the preferred identity mechanism as the default identity.
az cosmosdb update \
    --resource-group "<resource-group-name>" \
    --name "<source-account-name>" \
    --default-identity "SystemAssignedIdentity"
Tip
If you're using a user-assigned managed identity instead, run this command:
az cosmosdb update \
    --resource-group "<resource-group-name>" \
    --name "<source-account-name>" \
    --default-identity "UserAssignedIdentity=<fully-qualified-resource-id-of-user-assigned-managed-identity>"
Set up Azure Key Vault (Optional)
Tip
The migration job can use the target DocumentDB's native authentication credentials or use Microsoft Entra ID to connect. You don't need to set up Azure Key Vault if you're planning to use Microsoft Entra ID authentication.
When using DocumentDB's native authentication, the migration job uses an Azure Key Vault to retrieve the target authentication credentials.
To store the credentials in your existing key vault.
Navigate to your existing key vault.
If the Key Vault uses the Role-Based Access Control (RBAC) permission model, select the Access Control (IAM) option in the resource menu and assign the Key Vault Secret User role to the principal ID (object ID) of the managed identity used for your source account. Otherwise, use the Access policies option in the resource menu to create an access policy with Get and List Secret permissions, then assign it to the principal ID (object ID).
Navigate to Objects > Secrets, select Generate/Import to create a new secret. Use these values for your secret:
Description Name Secret names are used to identify the secret and can only contain alphanumeric characters and dashes. This value is eventually used in the migration job's Secret Name field. Secret value Paste the native authentication credentials for your Azure Cosmos DB for MongoDB target cluster here. Note
Ensure you use the native DocumentDB connection string as the Secret value.
In your newly created secret, gather the value of Vault URI. This value is eventually used in the migration job's Vault URI field.
Create migration job
First, create a migration job with the configuration required to start migrating data to the target cluster.
Sign in to the Azure portal (https://portal.azure.com).
Navigate to your Azure Cosmos DB for MongoDB account again.
On the account page, select Migrate to DocumentDB from the resource menu.

Select Start a new migration job.
Select migration mode
The Select Migration Mode section is used to provide the migration mode that's most appropriate for your migration needs.
Select the appropriate mode from these options:
Description Offline Offline migration captures a snapshot of the collection at the beginning, offering a simpler and predictable approach. It works well when using a static copy of the collection is acceptable, and real-time updates aren't essential. Use this option for nonproduction migrations. Online Online migration copies collection data, ensuring updates are also replicated during the process. This method is advantageous with minimal downtime, allowing continuous operations for business continuity. Use this option when ongoing operations are crucial, and reducing downtime is a priority. 
Important
Continuous Backup is a prerequisite for online migrations. For more information, see continuous backup.
Select Next.
Configure target migration credentials
The Select Target Account section is used to provide the connection details to the target Azure DocumentDB cluster. The migration job can use the target DocumentDB's native authentication credentials or use Microsoft Entra ID to connect.
As a security best practice, Microsoft Entra ID is the preferred authentication mechanism.
Configure using DocumentDB's native authentication
Set the Vault URI and Secret Name fields to the values you recorded earlier in this guide.

Select Next.
Configure using Microsoft Entra ID authentication
Make sure the managed identity configured on the source account has been assigned read-write privileges on the target DocumentDB cluster.
Set the Azure DocumentDB (with MongoDB Compatibility) account name field value.
Configure Network Security
The Configure Network Security section ensures that the target Azure DocumentDB cluster's network configuration allows the migration job to connect. Select one of the following options based on your target cluster's network configuration.
Public network access is enabled on target — Use firewall rules
Azure DocumentDB clusters are created locked down by default. To enable communication from the Azure Cosmos DB for MongoDB account, add the IP address shown in this step to the Azure DocumentDB firewall.
Observe the IP Address in this step.
Navigate to your target Azure DocumentDB cluster using another browser window or tab.
Select Networking in the Settings section of the resource menu.
Add a rule to allow access to the migration job's IP address. For more information, see manage cluster-level firewall rules.
Note
If network security is enabled on your Azure Key Vault, ensure the same IP is added to the Azure Key Vault Firewall as well.
Navigate back to the browser window or tab with the migration job configuration steps.
Select Next.
Public network access is disabled on target — Use Entra ID and network bypass
Network bypass mode provides a secure alternative to adding firewall rules when public network access is disabled on your target Azure DocumentDB cluster. Instead of opening firewall rules, bypass mode allows trusted Azure Cosmos DB services to access the cluster while blocking native authentication and all other public access. This creates a secure channel specifically for migration. For more information, see network bypass mode.
Important
Make sure the managed identity configured on the source account has been assigned read-write privileges on the target DocumentDB cluster.
Follow the steps in the enable network bypass mode section to configure your target cluster.
Navigate back to the browser window or tab with the migration job configuration steps.
Select Next.
Configure and start job
Use the Select Collections and Confirm & Submit sections to finalize your job's configuration.
Select the collections you plan to migrate in the Select Collections section.

Select Next.
Review the job configuration and provide a unique job name.
Important
- The migration job doesn't transfer the indexes to the target collections. Before proceeding, use this sample migration script to create the indexes on the target collections. Once the indexes are ready, select the checkbox.
- The migration job doesn't support changing the shard key. If you need a different shard key, migrate the data as an unsharded collection. Once the migration is complete, shard the collection on target using the desired shard key.
Select Submit to create and start the job.
Monitor migration jobs
Once a job is submitted, you can monitor the status of the newly created job along with other pending or completed jobs.
Navigate to your source Azure Cosmos DB for MongoDB account.
On the account page, select Migrate to DocumentDB from the resource menu.
Select Monitor existing migration job(s).
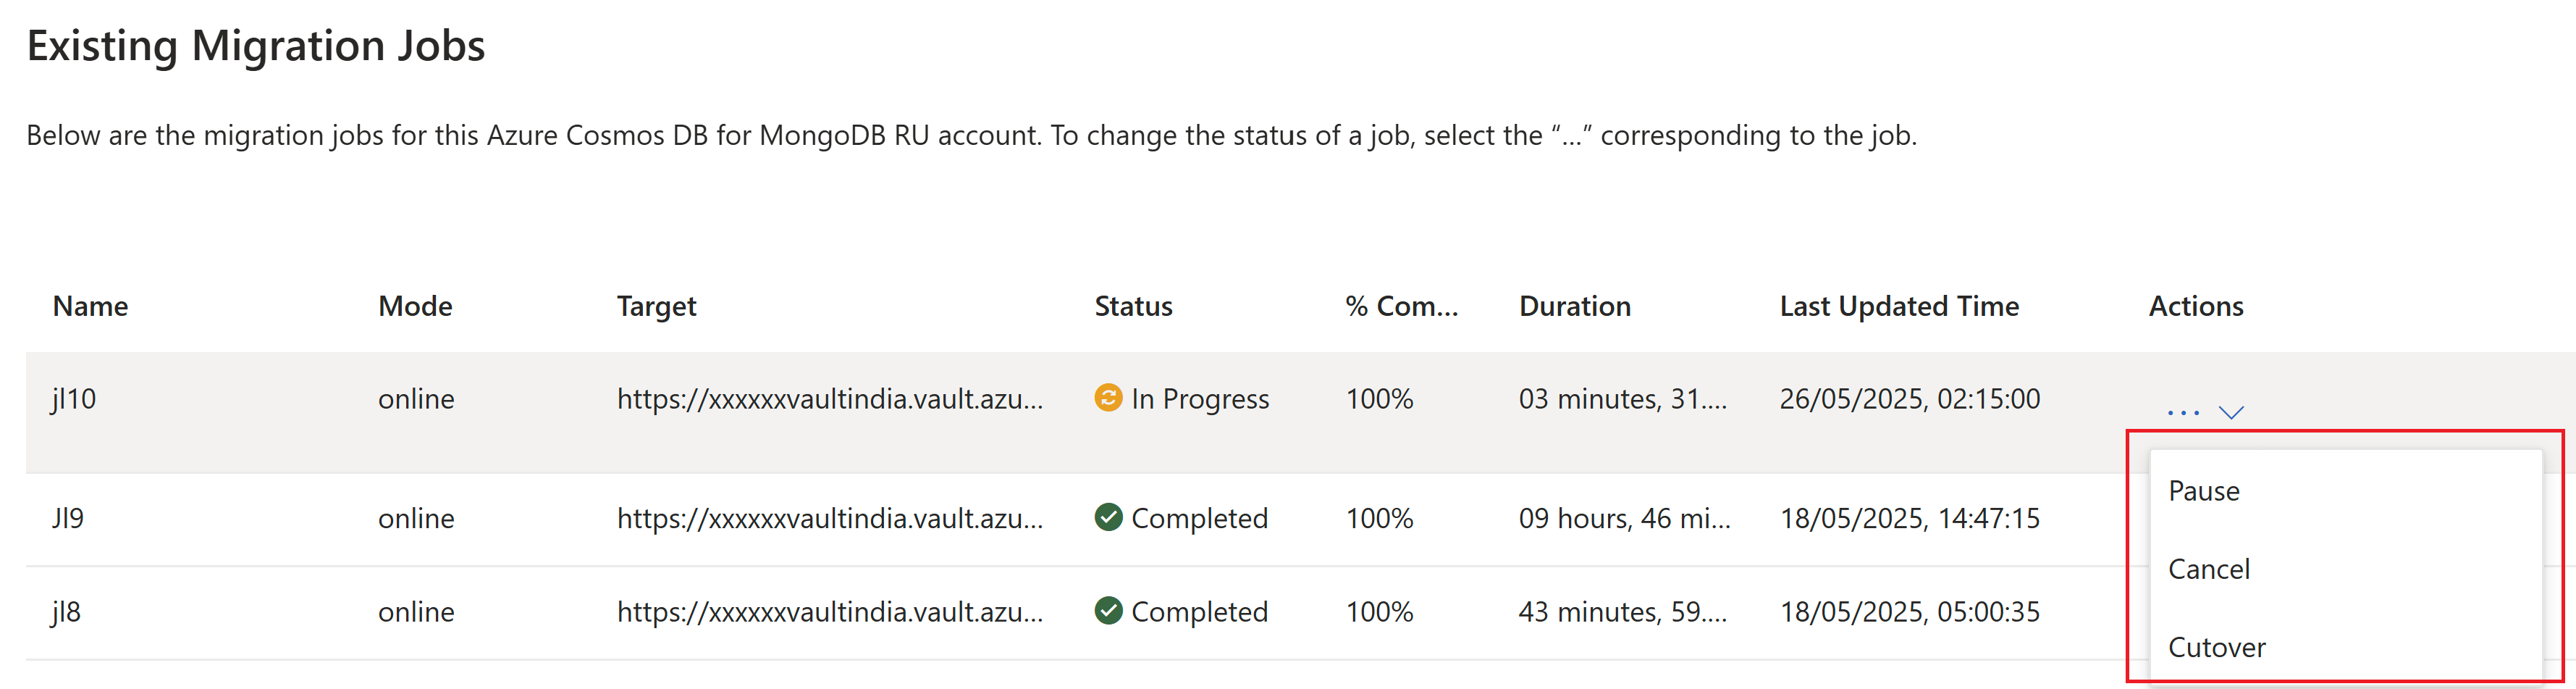
All migration jobs created for the current source account are listed.
Optionally, to change the status of a job, select the context menu (..) corresponding to the specific job. Options include:
Option Description Pause Temporarily pause a currently running job Resume Resume a paused job Cancel Permanently cancel a currently running job Cutover Finalize the migration when the source and target are synced Note
The cutover option is only applicable to online migrations. Once cutover is completed, the sync between the source account and target cluster is terminated. After performing a cutover, you should update the credentials in your client application to target the new Azure DocumentDB cluster.
Network bypass mode
Network bypass mode provides a secure alternative to adding firewall rules when public network access is disabled on your target Azure DocumentDB cluster. Instead of opening firewall rules, bypass mode allows trusted Azure Cosmos DB services to access the cluster through the AzureCosmosDB service tag while blocking native authentication and all other public access. This creates a secure channel specifically for migration.
Important
Network bypass mode requires API version 2026-02-01-preview or later. The ARM property is properties.networkBypassMode.
| Value | Description |
|---|---|
None (default) |
No bypass. Standard network rules apply. |
AzureCosmosDB |
Azure Cosmos DB service-tag traffic is allowed through the NSG. |
Prerequisites for network bypass mode
All three of the following conditions must be met on the target cluster before you can enable network bypass mode:
| # | Requirement | Detail |
|---|---|---|
| 1 | No firewall rules exist | Delete all existing firewall rules. |
| 2 | Public network access is disabled | properties.publicNetworkAccess must be Disabled. |
| 3 | Microsoft Entra ID is the only authentication mode | properties.authConfig.allowedModes must be ["MicrosoftEntraID"] (native authentication disabled). |
Enable network bypass mode
Complete the following steps in order. Wait for the cluster to reach Succeeded provisioning state between each step.
Delete all firewall rules
List existing firewall rules:
az rest --method get \
  --url "https://management.azure.com/subscriptions/{subscriptionId}/resourceGroups/{resourceGroupName}/providers/Microsoft.DocumentDB/mongoClusters/{clusterName}/firewallRules?api-version=2026-02-01-preview"
For each rule returned, delete it:
az rest --method delete \
  --url "https://management.azure.com/subscriptions/{subscriptionId}/resourceGroups/{resourceGroupName}/providers/Microsoft.DocumentDB/mongoClusters/{clusterName}/firewallRules/{ruleName}?api-version=2026-02-01-preview"
Note
If the cluster has no firewall rules, skip this step. Each firewall rule deletion completes in under a minute.
Disable public network access
az rest --method patch \
  --url "https://management.azure.com/subscriptions/{subscriptionId}/resourceGroups/{resourceGroupName}/providers/Microsoft.DocumentDB/mongoClusters/{clusterName}?api-version=2026-02-01-preview" \
  --body '{"properties": {"publicNetworkAccess": "Disabled"}}'
This operation typically completes in 2-5 minutes.
Switch to Microsoft Entra ID-only authentication
az rest --method patch \
  --url "https://management.azure.com/subscriptions/{subscriptionId}/resourceGroups/{resourceGroupName}/providers/Microsoft.DocumentDB/mongoClusters/{clusterName}?api-version=2026-02-01-preview" \
  --body '{"properties": {"authConfig": {"allowedModes": ["MicrosoftEntraID"]}}}'
Note
If the cluster already uses Microsoft Entra ID-only authentication, skip this step.
This operation typically completes in 5-10 minutes.
Set network bypass mode
az rest --method patch \
  --url "https://management.azure.com/subscriptions/{subscriptionId}/resourceGroups/{resourceGroupName}/providers/Microsoft.DocumentDB/mongoClusters/{clusterName}?api-version=2026-02-01-preview" \
  --body '{"properties": {"networkBypassMode": "AzureCosmosDB"}}'
Important
This is an asynchronous operation. Poll the operation URL from the response headers until the cluster returns to Succeeded state. This operation typically completes in 5-10 minutes. You can confirm the configuration using the verify the configuration step.
Verify the configuration
az rest --method get \
  --url "https://management.azure.com/subscriptions/{subscriptionId}/resourceGroups/{resourceGroupName}/providers/Microsoft.DocumentDB/mongoClusters/{clusterName}?api-version=2026-02-01-preview"
Confirm the response includes:
{
  "properties": {
    "networkBypassMode": "AzureCosmosDB",
    "publicNetworkAccess": "Disabled"
  }
}
After verification, return to the migration wizard and select Next to continue.
Side effects while bypass mode is active
While networkBypassMode is set to AzureCosmosDB:
- Firewall rules: Creating, updating, or deleting firewall rules returns an error. Listing rules returns an empty list.
- Public network access: Re-enabling public network access is blocked until bypass mode is disabled.
Troubleshoot network bypass mode
| Error message | Cause | Resolution |
|---|---|---|
| "networkBypassMode is only supported when publicNetworkAccess has been disabled…" | Public network access is still enabled. | Set publicNetworkAccess to Disabled first. |
| "networkBypassMode cannot be enabled while firewall rules exist…" | One or more firewall rules are present. | Delete all firewall rules first. |
| "networkBypassMode cannot be enabled unless Microsoft Entra ID authentication mode is enabled and Native authentication mode is disabled…" | Authentication configuration doesn't meet requirements. | Set authConfig.allowedModes to ["MicrosoftEntraID"]. |
| "Cannot enable public network access while network bypass mode is active…" | Attempting to enable public access while bypass is on. | Set networkBypassMode to None first. |
| "Firewall rules cannot be added while networkBypassMode is 'AzureCosmosDB'…" | Attempting to add a firewall rule while bypass is on. | Set networkBypassMode to None and then enable public access. |
Post migration actions
After the migration completes successfully, complete the following steps to revert any temporary configuration changes.
Disable network bypass mode
If you enabled network bypass mode during the migration, disable it to restore standard network rules.
az rest --method patch \
  --url "https://management.azure.com/subscriptions/{subscriptionId}/resourceGroups/{resourceGroupName}/providers/Microsoft.DocumentDB/mongoClusters/{clusterName}?api-version=2026-02-01-preview" \
  --body '{"properties": {"networkBypassMode": "None"}}'
This operation typically completes in 5-10 minutes. Disabling bypass mode has no prerequisites and can be done at any time. The AzureCosmosDB service tag is removed from the NSG and normal network rules resume.
Re-enable public network access (optional)
az rest --method patch \
  --url "https://management.azure.com/subscriptions/{subscriptionId}/resourceGroups/{resourceGroupName}/providers/Microsoft.DocumentDB/mongoClusters/{clusterName}?api-version=2026-02-01-preview" \
  --body '{"properties": {"publicNetworkAccess": "Enabled"}}'
Re-enable native authentication (optional)
Note
Native admin credentials must be provided when re-enabling native authentication. Replace {adminUser} and {adminPassword} with the cluster's admin username and a new password.
az rest --method patch \
  --url "https://management.azure.com/subscriptions/{subscriptionId}/resourceGroups/{resourceGroupName}/providers/Microsoft.DocumentDB/mongoClusters/{clusterName}?api-version=2026-02-01-preview" \
  --body '{"properties": {"authConfig": {"allowedModes": ["NativeAuth"]}, "administrator": {"userName": "{adminUser}", "password": "{adminPassword}"}}}'